Argosy 525 PTO
Home
Projects
All TenTec PTO's need to be cleaned and re-lubricated occasionally, and that
job is the same from one TenTec rig to the next. But getting the PTO out
of the radio is the interesting part, and it's not always obvious how to do it
with minimum disruption to the rest of the radio. Here's how I got to the
PTO in my Argosy 525...
Before you grab the Allen wrenches and the screwdrivers, I'd suggest getting
a soft towel to set your Argosy 525 on to keep it from getting scratched as you
flip it around.
1) Tune the dial as low as it will go. This will come in handy
when you're reassembling the radio.
2) Remove the bottom cover (2 screws on each side, plus 1 along the
back edge, and one in front of the speaker grille - for a total of 6
screws). 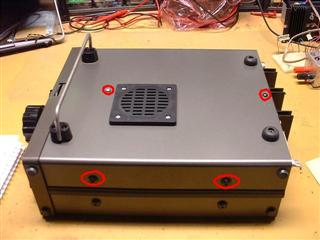 This is where I dig out some small containers to put parts in. I've got some old Play Dough containers left over from when my kids used them. I put a piece of tape on the container, and label it "Bottom Cover". That way, I'll get the right screws back in the
right place.
This is where I dig out some small containers to put parts in. I've got some old Play Dough containers left over from when my kids used them. I put a piece of tape on the container, and label it "Bottom Cover". That way, I'll get the right screws back in the
right place.
3) It's too bad every TenTec radio doesn't have a plug for the speaker
wires; that would be very convenient at this point. But, since there is no
such connector in the Argosy, I unsoldered the speaker wires at the phono
jack. Before you unsolder the wires, make a sketch of where they go so you
get them back in the right place. (As an option to unsoldering the speaker
leads, you could remove the speaker grille and the speaker from the bottom
cover. But then you'll have a speaker dangling from the radio. I
prefer the unsoldering approach.)
4) Remove all the knobs. You'll need one size Allen wrench for
the Mode and Band knobs, and another size for the rest of the knobs.
Sorry, I didn't note the sizes. Maybe you can help me fill in this
information.
5) Remove the green felt pads on the PTO shaft (there were two pads on
my rig), and then carefully pry off the metal dial skirt with your finger tips.
6) Remove the front panel (4 screws). Be aware that the S-meter is
loose, so don't let it drop out when you remove the panel. It's OK to let
the meter hang by its leads because the leads are quite short. The ALC LED
has a socket that may or may not come out when you remove the panel.
Disconnect the ALC LED if it doesn't self-disconnect.
7) Take a break and make a sketch of the inner front panel, showing the
positions of the dial, tensioning adjustment, and the path of the dial cord -
just in case. Personally, I prefer the sketch because it forces you to
notice details that might not show up in a photo. No harm in doing both.
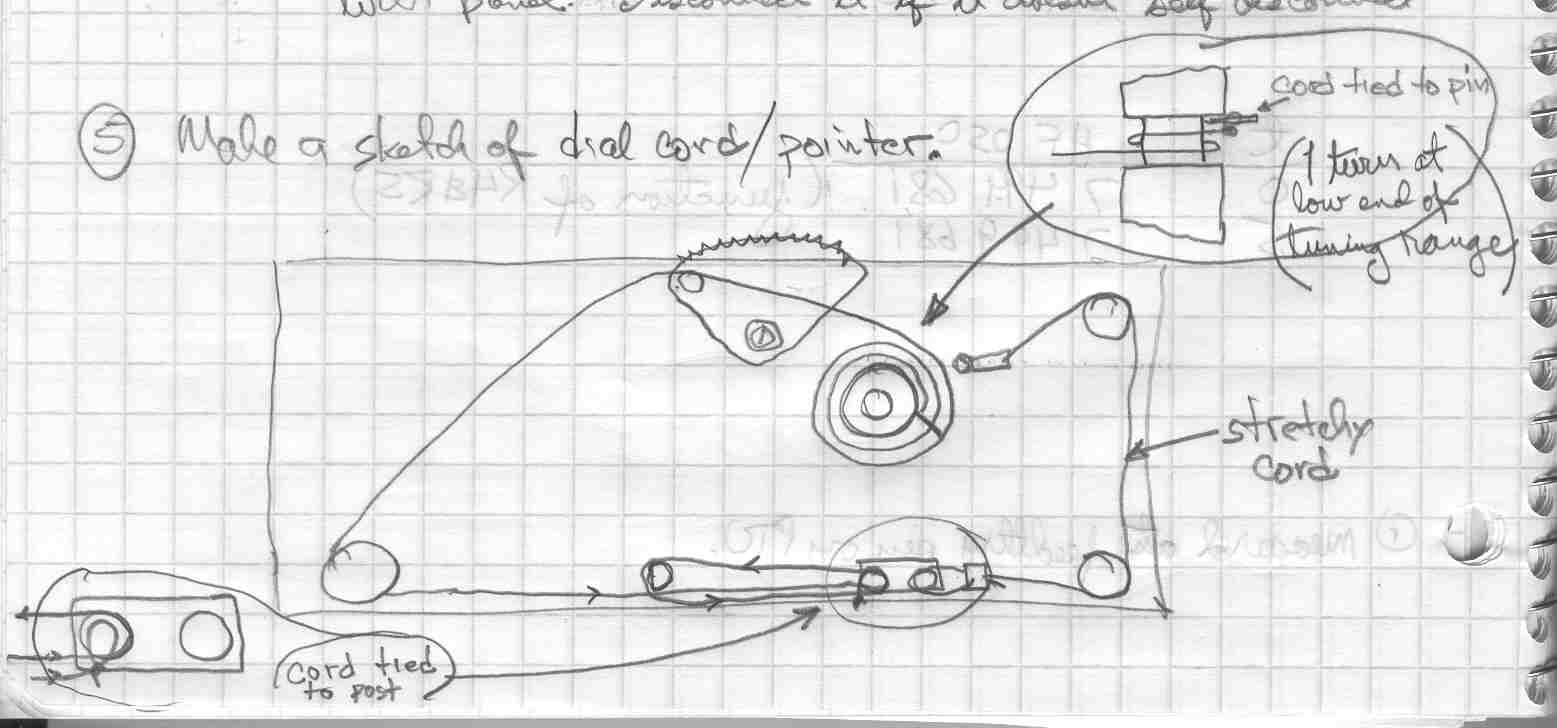
8) Remove 1 turn of the dial cord from the PTO shaft, and tape the cord
to the serrated tensioning wedge. Now remove the knotted end of the dial
cord from the pin on the PTO shaft.
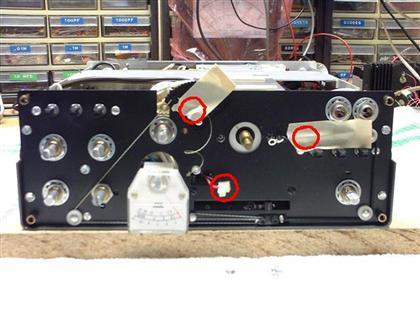
9) Remove the left PTO screw (as viewed looking at the front of the
upside down radio).
10) Tape the stretchy cord to the right of the PTO shaft to the inner
front panel (see photo).
11) Remove the right PTO screw and lockwasher on the front panel.
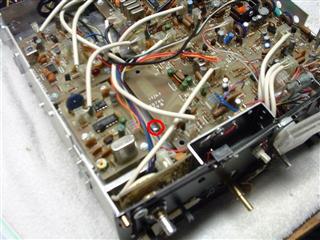
12) Turn the radio right side up, remove the top cover (4 screws), and
locate the IF/AF Board (it's the large board, in front). Remove the (5)
screws holding this board. You'll have to remove the crystal filter to get to the screw in the corner.
13) Lift the IF/AF board up enough to get to the third PTO screw on the
chassis. Remove this screw, and let the IF/AF board settle back down.
14) Make a sketch of the PTO wires, then unsolder them from the PTO
box.
Now you can remove the PTO.
From this point, you can follow the directions on the TenTec PTO Rebuild
Sheet, or refer to K5ESE's (formerly N5FC) excellent article "Rebuilding
the Century 21 PTO/Veneer". You can find this at
http://www.io.com/~n5fc/
c21_pto.htm. Or, you can follow my less-detailed description below.
15) Remove the bottom cover of the PTO.
16) Very carefully remove the pin from the tuning shaft in front of the
PTO box, and put it in a container labeled "PTO Parts".
17) Remove (2) screws from the black plastic bearing on the rear of the
PTO box. There will also be one or two pairs of flat washers between the
plastic bearing and the box. Remove these also. Put these parts in
the "PTO Parts" container.
18) Remove the spring and washer that come out with the plastic
bearing. Remove the washer remaining on the PTO shaft. Put these in
the "PTO Parts" container also.
19) Push the tuning shaft toward the back of the box to remove the
plastic beveled washer and the stop pin. Put these with the rest of the
PTO Parts.
20) Clean the parts in mineral spirits and lubricate with White Lithium
Grease. Other lubricants (Mobil One Synthetic Grease, Bicycle Grease, etc)
have been used for this, but I prefer the White Lithium Grease because it's not
as thick as some of the other greases which results in easier tuning.
21) Reassemble the PTO, applying lubrication on all bearing and sliding
surfaces of the tuning mechanism.
22) Reinstall the PTO, reconnect the wires, remount the IF/AF Board,
and reinstall the crystal filter.
23) Reinstall the pin on the PTO shaft, and reconnect the dial cord.
24) If you're interested in eliminating the sensitivity of the tuning
knob to hand capacitance, now is the time to fix it. See "PTO
SENSITIVITY TO HAND CAPACITANCE" in the Projects list.
25) Now is a good time to check the calibration of the tuning dial
because you can move the pointer a small amount to make the correction.
See the TenTec manual for details.
26) Reinstall the ALC LED, place the S-meter in its proper position, and
reinstall the Front Panel.
27) Reinstall all the knobs. (If any of them are "mushy"
, see my fix for that, "TenTec Mushy Knobs" in the Project list.)
28) Reinstall the top and bottom covers.
Your Argosy should now tune as smooth as silk, and the White Lithium Grease
will be good for many years.
If you find any errors or omissions in this procedure or have any
suggestions, please send me an email. I'll revise this document as soon as
I can.
72/73,
ed - k9ew

